To move something in the real world, more volts and amperes are needed than Arduino can put out by itself. Relay to the rescue.
A relay is an electrically operated switch. Very nice description by http://en.wikipedia.org/wiki/Relay
Unfortunately, connecting a relay directly to Arduino is not possible or at least not feasible.
Relays usually need more than 40mA at 5V to operate. And that is the maximum, Arduino can supply. So more electronic components are needed.
At least three good stories, implementing almost the same schematics are http://www.glacialwanderer.com/hobbyrobotics/?p=9,
http://www.arduino.cc/playground/uploads/Main/relays.pdf and http://crackburg.wordpress.com/2009/08/01/relaistreiber-0-2/
A good way to calculate what components are needed is in http://www.instructables.com/id/Connecting_a_12V_Relay_to_Arduino/
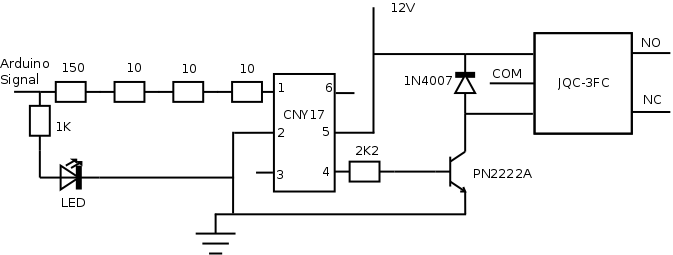
As the last one has the most components and also it is referenced as more advanced way of doing things. Optical decoupler should keep Arduino safe from higher voltages.
Things I got are:
- 3x 10 Ohm 1/4w resistor
- 150 Ohm 1/4w resistor
- 2.2 KOhm 1/4w resistor
- PN2222A transistor
- 1N4007 diode
- CNY17-2 optron
- JQC-3FC 12V relay
- 1 KOhm resistor for LED
- LED. 5v, any color
This is a bit different from what those examples, referred earlier, specified, because I could not get everything locally and I also was a bit impatient and got things that were in stock.
PN2222A is equivalent for 2N2222, 1N4007 should, in this application be as good as 1N4004. CNY17 is a different story. There are modifications. I just took one.
12V relay is a deliberate choice.
There is a need for external power in this circuit. Just getting a separate power supply for driving relays is stupid. And Arduino needs some power too. It is nice to combine those.
Recommended input voltage for Arduino is 7-12V and one standard voltage for relays is 12V. If external power is connected to Arduino Duemilanove thorough power plug, then it can be accessed from VIN pin. Neat.
This 12V relay has 5 contacts, COM, NC and NO are for 220V. Depending which contact to use, it can be used either as power switched on with Arduino or switched off.
To be able to tell visually, if relay is switched on or not, I added a led to the same output pin.
Actual schematics is almost as in http://images.crackburg.de/relais002.jpg
At least no smoke and seems to work.
Controlling relay from Arduino is like controlling a led. Simple.
Pictures of one implementation using thermometers and relays can be seen in heater-controller-hardware.
Actually, if you want to command 220V (or anything else) from an Arduino, the easiest and likely cheapest solution is … to buy a ready made board. On eBay, you’ll find 2-4-8- or 16-channel relay boards, working on 5V, 12V, 24V for less than you’ll have to pay for the parts alone.
Regarding the original drawing above, I wonder why there are 4 resistances in series, since this is all low voltage. Since there is galvanic separation in the relay, you also don ‘t strictly need to add the optocoupler, but I agree this is safer.
Pin #2 of CNY17 shouldnt be connected to the power supply ground.
Youre missing the point of the CNY17. Its an optocoupler, designed to provide seperation in a circuit.
Connect your uC ground to pin 2.